1. What is activity?
In Android, an Activity is a component that provides a user interface for an app. It represents a single screen with a user interface that can contain buttons, text fields, images, and other UI elements. Activities are the building blocks of Android apps, and each Activity can be called independently to perform a specific action or task. They can also be used to interact with other Activities, services, and broadcast receivers.
2. What is multimedia database?
A multimedia database is a database that stores multimedia such as images, audio, video, and other media types. It allows users to efficiently search and retrieve multimedia data based on metadata or content. Multimedia databases are used in a variety of applications such as digital libraries, entertainment, education, and healthcare.
3. What is service?
In Android, a Service is a component that runs in the background to perform long-running tasks without the need for user interaction. It is used to perform tasks that need to continue running even when the app is not in the foreground or is destroyed. Services can be used for tasks such as downloading data, playing music, or monitoring sensors.
4. What is intent?
In Android, an Intent is an object that provides a way to communicate between components such as activities, services, and broadcast receivers. It is used to start an activity, start a service, or send a broadcast message. Intents can also be used to pass data between components and to specify actions to be performed.
5. What is SQLite?
SQLite is a lightweight relational database management system that is used in Android to store structured data. It provides a simple and efficient way to store and retrieve data in a local database on the device. SQLite is used to store data for many Android apps such as contacts, messages, and settings. It is easy to use, fast, and reliable, making it a popular choice for local data storage in Android apps.
6. Enlist features of service.
- Runs in the background: Services run in the background, even if the app is not visible to the user.
- Performs long-running tasks: Services can perform long-running tasks that do not require user interaction, such as downloading large files or playing music.
- Independent of user interface: Services do not have a user interface and can run independently of the app's user interface.
- Can communicate with other components: Services can communicate with other components of an app, such as Activities and broadcast receivers, using Intents.
- Can run as a foreground service: Services can run as a foreground service, which provides a notification to the user and keeps the service running even if the app is not in the foreground.
7. Describe the term Indent Filter with example.
An Intent Filter is an expression in an app's manifest file that specifies the types of Intents that the component can respond to. It tells the system what types of actions, categories, and data formats an Activity, service, or broadcast receiver can handle.
For example, if an app has an Activity that can view images, it can specify an Intent Filter that tells the system that it can handle the ACTIONVIEW action with the image/ MIME type. When the user selects an image file in another app, the system sends an Intent with the ACTIONVIEW action and the image/ MIME type. The system checks the manifest files of all installed apps to find one that has an Activity that can handle the Intent, and then starts that Activity.
8. What is sensor? Enlist its types in Android.
In Android, a sensor is a hardware component that measures physical quantities such as acceleration, orientation, and temperature. It allows apps to gather data from the environment and use it to provide new features and services. There are several types of sensors available on Android devices, including:
- Accelerometer: Measures the acceleration of the device in three dimensions.
- Gyroscope: Measures the angular velocity of the device in three dimensions.
- Magnetometer: Measures the magnetic field of the device in three dimensions.
- Proximity sensor: Detects the presence of nearby objects without physical contact.
- Light sensor: Measures the ambient light level in the environment.
- Temperature sensor: Measures the temperature of the device.
9. Explain activity life cycle diagrammatically.
The Activity Lifecycle in Android refers to the series of states an Activity can be in during its lifetime. The states are represented by callbacks that the system calls as the Activity transitions from one state to another. The diagram below shows the basic lifecycle of an Activity:
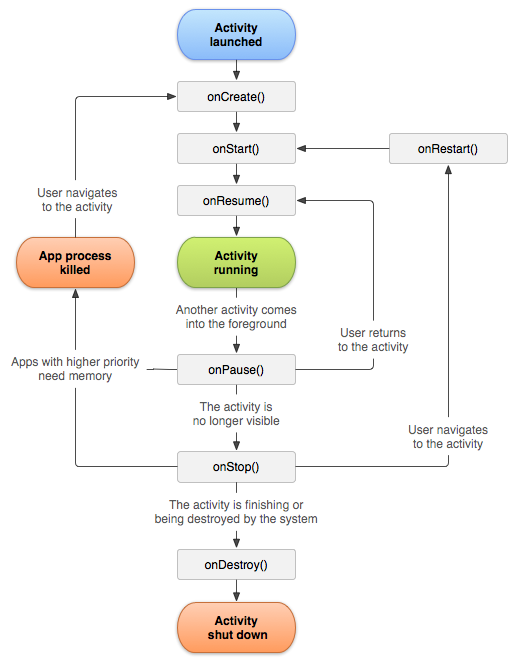
onCreate(): This is called when the Activity is first created. It is where you should initialize the UI and other variables that are needed for the Activity to run.onStart(): This is called when the Activity becomes visible to the user. It is where you should start any animations or other UI updates.onResume(): This is called when the Activity is in the foreground and the user can interact with it. It is where you should start any services or threads that are needed for the Activity to run.onPause(): This is called when the Activity is about to be paused. It is where you should save any data that you want to persist between sessions.onStop(): This is called when the Activity is no longer visible to the user. It is where you should stop any animations or other UI updates.onDestroy(): This is called when the Activity is about to be destroyed. It is where you should release any resources that the Activity is using, such as threads or services.
10. What is fragment? Describe with example.
A Fragment in Android represents a portion of a user interface or behavior that can be added to an Activity or another Fragment. It is like a modular section of an Activity that can be reused in multiple Activities or within a single Activity to create a flexible UI design. Fragments were introduced in Android 3.0 (API level 11) to support larger screen devices like tablets, but they can also be used on smaller screen devices for their reusability and flexibility.
For example, consider a messaging app that has a list of conversations on the left side of the screen and a chat window on the right side. The left side could be a Fragment containing the list of conversations, and the right side could be another Fragment containing the chat window. These two Fragments could be combined within a single Activity to create the messaging screen. Fragments can be added, removed, replaced, or swapped within an Activity at runtime based on user interactions or device configurations.
Here's an example of how to create a Fragment in Android:
public class MyFragment extends Fragment {

    // Required empty public constructor
    public MyFragment() {}

    @Override
    public View onCreateView(LayoutInflater inflater, ViewGroup container,
                             Bundle savedInstanceState) {
        // Inflate the layout for this fragment
        return inflater.inflate(R.layout.fragment_my, container, false);
    }
}
In this example, we are creating a Fragment called MyFragment that inflates a layout resource called fragment_my. This layout resource defines the UI elements for the Fragment. The onCreateView method is called when the Fragment is created and returns the View that will be displayed on the screen.
11. Explain content provider in detail.
In Android, a Content Provider is a component that manages access to a structured set of data. It acts as a mediator between an application and a data source such as a database, file system or network resource. The Content Provider provides a standard interface to store, retrieve, update or delete data in a consistent manner, regardless of the underlying data source.
Content Providers can be used to share data between multiple applications securely. For example, an app that manages contacts can use a content provider to allow other apps to access the contact data.
A Content Provider is implemented as a subclass of the ContentProvider class and provides a set of methods to manage the underlying data source. The most common methods are:
query(): retrieves data from the providerinsert(): adds new data to the providerupdate(): modifies existing data in the providerdelete(): removes data from the provider
The data is represented as a set of rows, where each row is a set of key-value pairs. The keys are column names and the values are the corresponding data for each column.
To access a Content Provider, an application can use a ContentResolver object. The ContentResolver sends requests to the Content Provider using a uniform resource identifier (URI) that identifies the data to be accessed. The URI can include additional information such as the table or column names, and filtering criteria.
Overall, Content Providers provide a standardized mechanism to manage and share data between multiple applications in a secure and efficient manner.
12. With the help of diagram explain activity broadcast life cycle.
When a Broadcast Intent is sent to the Android system, it is delivered to all the Broadcast Receivers that have registered to receive it. If the Broadcast Receiver belongs to an Activity, the system creates an instance of that Activity if it doesn't already exist, and then delivers the Intent to the Activity's onReceive() method. The Activity then goes through its own lifecycle methods as follows:
- If the Activity is not yet created, the
onCreate()method is called, followed byonStart()andonResume(). - If the Activity is already created and running in the foreground, the
onNewIntent()method is called to handle the new Intent. - If the Activity is running in the background, the system creates a new instance of the Activity and calls its
onCreate()method, followed byonStart()andonResume(). - If the Activity is not running at all, the system creates a new instance of the Activity and calls its
onCreate()method, followed byonStart()andonResume().
After the Activity is created or resumed, it can perform any necessary processing based on the contents of the Intent. Once the processing is complete, the Activity can then finish and return control to the system.
Overall, the Activity Broadcast Life Cycle in Android is closely tied to the overall Activity life cycle, with the added step of handling the Broadcast Intent through the onReceive() method.
14. What is animation? Enlist its types.
In Android, an animation is a visual effect applied to a View or a layout to create a more engaging and dynamic user interface. Animations can be used to draw the user's attention to certain UI elements, provide feedback on user actions, or simply make the interface more aesthetically pleasing.
Android supports various types of animations, including:
- Property Animation: This animation allows the modification of object properties over a period of time. It can animate properties such as position, size, rotation, and alpha values of the View.
- View Animation: This animation changes the appearance of the View by applying a set of transformation effects such as rotation, scaling, and alpha changes.
- Drawable Animation: This animation animates the contents of a Drawable resource. It can be used to create simple frame-by-frame animations.
- Frame Animation: This animation allows switching between a series of Drawable resources to create an animation.
- Transition Animation: This animation animates the transition between two Views by automatically animating the common elements between the Views.
Android provides APIs to create these animations programmatically or by using XML files. Animations can also be created using third-party libraries.
15. Describe the term audio capture in detail.
Audio capture in Android refers to the process of recording audio from the device's microphone or an external audio source. It is useful for a wide range of applications, such as recording voice memos, creating podcasts, or building audio analysis tools.
Android provides a set of APIs for audio capture, which can be accessed through the MediaRecorder class. The MediaRecorder class allows the recording of audio in various formats such as AAC, AMR, and MP3. It also provides a set of options for controlling the quality, duration, and source of the audio.
The process of capturing audio typically involves the following steps:
- Requesting permission to access the microphone.
- Creating an instance of the
MediaRecorderclass. - Configuring the
MediaRecorderobject with the desired options such as output format, audio source, and encoding. - Preparing the
MediaRecorderobject for recording. - Starting the recording using the
start()method. - Stopping the recording using the
stop()method. - Releasing the resources used by the
MediaRecorderobject using therelease()method.
In addition to the MediaRecorder class, Android also provides APIs for audio playback and analysis, making it a powerful platform for audio-related applications.
16. How to play audio and video in Android?
In Android, audio and video can be played using the MediaPlayer class, which provides a simple API for playing various media formats such as MP3, AAC, WAV, and MPEG-4. The MediaPlayer class can also be used to control playback features such as play, pause, stop, seek, and volume.
To play audio or video in Android, you can follow these steps:
- Create an instance of
MediaPlayerclass. - Set the data source for the media using the
setDataSource()method. The data source can be a file, URL, or a raw resource. - Prepare the
MediaPlayerfor playback using theprepare()method. - Start the playback using the
start()method. - Control the playback using various methods such as
pause(),stop(),seekTo(), andsetVolume().
Here is an example code snippet for playing an audio file in Android:
MediaPlayer mediaPlayer = new MediaPlayer();
mediaPlayer.setDataSource("path/to/audio/file.mp3");
mediaPlayer.prepare();
mediaPlayer.start();
To play a video file, you can use the VideoView class, which provides a simple way to display and control video playback. The VideoView class internally uses the MediaPlayer class for playback. Here is an example code snippet for playing a video file in Android:
VideoView videoView = findViewById(R.id.videoView);
videoView.setVideoURI(Uri.parse("path/to/video/file.mp4"));
videoView.start();
17. How to create and connect SQLite? Explain with example.
To create and connect to a SQLite database in Android, you can follow these steps:
- Create a class that extends
SQLiteOpenHelperand override its methods. This class will handle the creation and version management of the database.
public class MyDatabaseHelper extends SQLiteOpenHelper {

    private static final String DATABASE_NAME = "mydatabase.db";
    private static final int DATABASE_VERSION = 1;

    public MyDatabaseHelper(Context context) {
        super(context, DATABASE_NAME, null, DATABASE_VERSION);
    }

    @Override
    public void onCreate(SQLiteDatabase db) {
        // Create tables and initial data
        db.execSQL("CREATE TABLE mytable (_id INTEGER PRIMARY KEY AUTOINCREMENT, name TEXT);");
        db.execSQL("INSERT INTO mytable (name) VALUES ('John');");
        db.execSQL("INSERT INTO mytable (name) VALUES ('Mary');");
    }

    @Override
    public void onUpgrade(SQLiteDatabase db, int oldVersion, int newVersion) {
        // Upgrade database schema or migrate data
        db.execSQL("DROP TABLE IF EXISTS mytable;");
        onCreate(db);
    }
}- Instantiate the
MyDatabaseHelperclass and get a reference to aSQLiteDatabaseobject. You can perform CRUD (Create, Read, Update, Delete) operations on the database using this object.
MyDatabaseHelper dbHelper = new MyDatabaseHelper(context);
SQLiteDatabase db = dbHelper.getWritableDatabase();

// Insert a record
ContentValues values = new ContentValues();
values.put("name", "Peter");
long id = db.insert("mytable", null, values);

// Query for records
Cursor cursor = db.query("mytable", null, null, null, null, null, null);
while (cursor.moveToNext()) {
    int id = cursor.getInt(cursor.getColumnIndex("_id"));
    String name = cursor.getString(cursor.getColumnIndex("name"));
    Log.d("MyApp", "Record: " + id + ", " + name);
}

// Update a record
ContentValues updateValues = new ContentValues();
updateValues.put("name", "Mary Smith");
int rowsAffected = db.update("mytable", updateValues, "_id=?", new String[]{String.valueOf(id)});

// Delete a record
int rowsDeleted = db.delete("mytable", "_id=?", new String[]{String.valueOf(id)});

// Close the database
db.close();
In this example, the MyDatabaseHelper class creates a table called mytable with an _id column and a name column. It also inserts two records into the table when the database is first created.
The SQLiteDatabase object is obtained by calling the getWritableDatabase() method on the MyDatabaseHelper object. You can then use this object to perform CRUD operations on the database.
Note that the ContentValues class is used to insert or update records in the database. It is a key-value map that represents a database row. The insert() method returns the ID of the newly inserted record, which can be used to update or delete the record later.
18. With the help of diagram describe following frame works:
Multimedia
Android system architecture
19. Describe the term text to speech in detail.
Text to Speech (TTS) is a technology that converts written text into spoken words. In Android, TTS is a feature that allows developers to add speech functionality into their applications. This feature can be useful for providing audio feedback to users, such as reading out messages or alerts, or for making apps more accessible for users with visual impairments.
The Android TTS API provides a framework for developers to create applications that can convert text into speech. The TTS engine used in Android is based on the open-source eSpeak engine, which is a compact, fast and multi-lingual speech synthesizer.
To use TTS in an Android application, developers need to first create an instance of the TextToSpeech class and then set a listener to receive callbacks when the speech is finished. They can then use the speak() method of the TextToSpeech class to convert the text to speech.
Here's an example of how to use TTS in an Android application:
public class MainActivity extends AppCompatActivity implements TextToSpeech.OnInitListener {

    private TextToSpeech textToSpeech;

    @Override
    protected void onCreate(Bundle savedInstanceState) {
        super.onCreate(savedInstanceState);
        setContentView(R.layout.activity_main);

        // Create a TextToSpeech object
        textToSpeech = new TextToSpeech(this, this);

        // Set a button click listener to convert text to speech
        Button speakButton = findViewById(R.id.speak_button);
        speakButton.setOnClickListener(new View.OnClickListener() {
            @Override
            public void onClick(View v) {
                String text = "Hello, how are you?";
                textToSpeech.speak(text, TextToSpeech.QUEUE_FLUSH, null);
            }
        });
    }

    @Override
    public void onInit(int status) {
        if (status == TextToSpeech.SUCCESS) {
            int result = textToSpeech.setLanguage(Locale.US);

            if (result == TextToSpeech.LANG_MISSING_DATA
                    || result == TextToSpeech.LANG_NOT_SUPPORTED) {
                Log.e("TTS", "Language not supported");
            }
        } else {
            Log.e("TTS", "Initialization failed");
        }
    }

    @Override
    protected void onDestroy() {
        super.onDestroy();
        if (textToSpeech != null) {
            textToSpeech.stop();
            textToSpeech.shutdown();
        }
    }
}
In this example, we create a TextToSpeech object in the onCreate() method of the main activity, and set a click listener on a button to convert text to speech. We also implement the onInit() method to check if the TTS engine is initialized successfully, and set the language to US English. Finally, we override the onDestroy() method to release the TTS resources when the activity is destroyed.
20. How to extracting values from cursors in Android?
To extract values from a cursor in Android, you need to follow these steps:
- Move the cursor to the position of the row whose data you want to extract by calling the
moveToPosition()method of the cursor. - Call the appropriate getter method of the cursor to extract the value for a specific column in the current row. The getter method to use depends on the data type of the column. For example, use
getString()to extract a string value,getInt()to extract an integer value,getDouble()to extract a double value, etc. - Repeat step 2 for each column you want to extract data from.
- Once you have extracted all the desired data, close the cursor by calling the
close()method to release the resources.
Here is an example code snippet that shows how to extract data from a cursor:
Cursor cursor = getContentResolver().query(CONTENT_URI, null, null, null, null);
if (cursor.moveToFirst()) {
    do {
        String name = cursor.getString(cursor.getColumnIndexOrThrow("name"));
        int age = cursor.getInt(cursor.getColumnIndexOrThrow("age"));
        double salary = cursor.getDouble(cursor.getColumnIndexOrThrow("salary"));

        // Do something with the extracted data

    } while (cursor.moveToNext());
}
cursor.close();
In this example, CONTENT_URI is the URI for the content provider that provides the cursor, and "name", "age", and "salary" are the names of the columns whose values are being extracted.
21. What is transaction? Describe with example.
In Android, a transaction is a set of database operations that are executed as a single unit of work. Transactions ensure that all database operations either succeed or fail as a group, and that the database is always left in a consistent state. Transactions also provide a way to roll back changes if an error occurs during the transaction.
Here is an example of how to use transactions in Android:
SQLiteDatabase db = dbHelper.getWritableDatabase();

try {
    db.beginTransaction();

    // Perform database operations here
    db.insert("employees", null, values1);
    db.update("employees", values2, "salary < ?", new String[] { "50000" });
    db.delete("employees", "age > ?", new String[] { "65" });

    db.setTransactionSuccessful(); // Commit the transaction
} finally {
    db.endTransaction(); // End the transaction
}

db.close();
In this example, the beginTransaction() method starts a new transaction, and the setTransactionSuccessful() method marks the transaction as successful. If an exception occurs during the transaction, the endTransaction() method will be called without setTransactionSuccessful(), causing the transaction to be rolled back. Finally, the endTransaction() method ends the transaction and releases any resources associated with it.
It's important to note that transactions should only be used when performing multiple operations that need to be executed as a group. For single operations, transactions are unnecessary and can even be a performance bottleneck.
22. Explain service life cycle diagrammatically.
Here is a diagrammatic representation of the Service life cycle in Android:
  Start Service                          Stop Service
       |                                        |
       v                                        v
 +-----------+                          +-----------+
 |  Created  |---->onCreate()------->|  Started  |
 +-----------+                          +-----------+
       |                                        |
       v                                        v
 +-----------+                          +-----------+
 |   Bound   |---->onBind()---------->|  Running  |
 +-----------+                          +-----------+
       |                                        |
       v                                        v
 +-----------+     Unbind or stopSelf()  +-----------+
 |  Unbound  |<----onUnbind() or onStop()|   Stopped |
 +-----------+                          +-----------+
       |                                        |
       v                                        v
 +-----------+                          +-----------+
 |  Destroyed|---->onDestroy()-------->| Terminated|
 +-----------+                          +-----------+
- Created: When a service is created, the
onCreate()method is called. This is where the service initializes its resources and sets itself up to be run. - Started: When a service is started using the
startService()method, the service transitions to the started state. TheonStartCommand()method is called, which is where the service performs its work. - Bound: When a service is bound using the
bindService()method, the service transitions to the bound state. TheonBind()method is called, which returns anIBinderinterface that allows the client to interact with the service. - Running: When a service is both started and bound, it is in the running state. The service can continue to perform its work while allowing clients to interact with it.
- Unbound: When a client unbinds from a service using the
unbindService()method, the service transitions to the unbound state. TheonUnbind()method is called, which allows the service to clean up any resources that are no longer needed. - Stopped: When a service is no longer needed, it can be stopped using the
stopService()method. TheonStop()method is called, which allows the service to clean up any resources that are no longer needed. - Destroyed: When a service is no longer needed and all clients have disconnected from it, the service is destroyed. The
onDestroy()method is called, which allows the service to perform final cleanup before it is terminated.